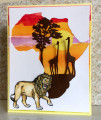
Copic markers: From left to right on the panel and on each color application – B24,23,21, YR09,07,04, BV08,04,02, E29,27,25, E09,05,03, R29,27,24, C5,4,3, Y15,13,11, RV25,23,21, V17,15,12, E09,08,07, background – B00,000,0000
The Perfect Layers tools from Perfect Paper Crafting was used to cut the borders. Use any brand craft knife or rotary cutter for cutting. A tutorial video can be found on the company site.
For the ink splatters: apply ink onto the end (about ½”) of a long stick pin, place it against a metal ball stylus (any object will work) and slid the pin down while applying pressure; when it reaches the end it flicks the ink in a splatter formation across the card. Wipe the tools clean to continue with another color and before storing away. I put a scrap paper down on the work surface to catch excess ink and always wipe the area around the scrap paper with a wet wipe in case ink flicked beyond it.
The image panel with borders is popped up with foam tape.
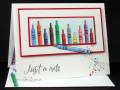
After cutting the accent crayon out a Marvy black marker was used to color the very edge of the cardstock, a piece of the red cardstock was glued onto the bottom so it lies even on the card with the tip resting on the red border. AleeneÂ’s tacky glue was used to glue it to the card.